.png?height=120&name=logo%20(3).png)
In this article, you'll find information on how to create a budget an the options available for creating your budget.
Table of contents
Introduction
Welcome to our step-by-step guide on creating a new project in Planyard. This guide is designed for users who have the necessary permissions to create, edit, and archive projects. If you do not have these permissions, please contact your company account owner to adjust your access.
Creating a new project in Planyard is straightforward process. Whether you are starting a small project or a large-scale operation, Planyard offers flexible options to set up your project budget. You can enter line items manually, upload a budget template, or utilise a predefined company project template.
This article will walk you through the process of creating a new project from selecting the project template to filling out detailed budget information. Read on to learn how to set up your project in Planyard and explore the functionalities designed to enhance your project budgeting experience.
Create a new project
In order to create a new project in Planyard, you must have the permission to create, edit and archive projects. If you you don't have this permission, contact your company account owner to adjust this.
In order to create a new project follow these steps:
- Click 'Projects' in the top menu row.
- Click 'Create Project' in the top right corner.
- Fill out the information for your project:

- Project name: Name your project
- Select Currency: Choose the currency to be used for your project.
- Project address: Enter the project address.
- Project code: Enter the project code, this could be numbers or letters. The project number will be used to create reference numbers for subcontracts and purchase orders.
- Project upload method: select whether to you want to create the project budget by uploading line-items one by one, by uploading a project budget template or by selecting line-items from a company project template.
- Click 'Create'.
Once this is done, you will be forwarded to a new page that will depend on which option you've selected for the project upload method. You find more information on the next step under the sections for each method.
Project upload method
The project budget in Planyard is composed of cost headings, subheadings, and line items. All costs within your project will be linked to these line items, and totals and subtotals will automatically be calculated based on the values of your line items.
There are three different methods for uploading your budget to Planyard:
- You can add your budget items individually directly on the platform.
- You can use our budget template spreadsheet to upload all figures in a batch.
- You can use company templates to select the line items that will be relevant for your project directly on the platform.
Add line-items on by one
By selecting the option to add line-items one by one you create a project with a blank budget where you subsequently add all of the line items for your budget one by one. In order to add a new line-item or cost heading, click on 'Budget' in the project menu row and follow these steps:
- Click 'Add line-item' in the top right corner
- Select 'Add custom'
- Fill out the requested information:

- Add a cost code if needed
- Add the name of the line-item
- When you create your first budget line-item in Planyard, it will automatically be placed at the end of your budget list. After adding this initial line-item, you'll have the option to add new line-items directly below it. Essentially, your first line-item acts as a main category, allowing you to organise subsequent line-items within that category. You can continue to create as many nested layers of subcategories as necessary within each category.
- Chose unit of measurement for the line item.
- Click 'Create'
Follow the steps above for each line-item you want to create in your budget.
Add information to line-items
Next step would be to add information for all line-items created. Note that you only have to add information on the line-items, not for main or subcategories, these will have summarised numbers automatically.
The three columns you can add information to is Net estimated cost, Budget submitted to client and Target Budget. If your net estimated cost has the same value as the target budget, then just add information in the target budget.
The same information is added for the columns mentioned above. When you hover over a cell where you want to adjust information, a pen symbol will appear, click on the symbol to adjust the information:
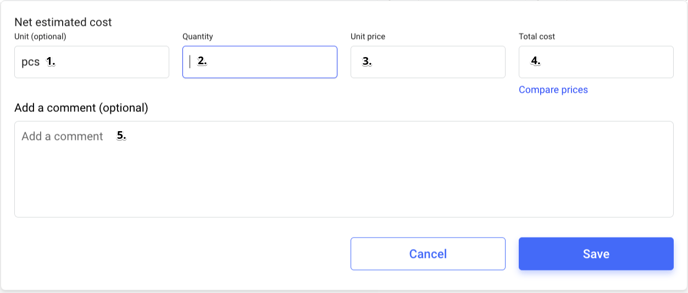
- Unit of measurement will be filled out based on the information provided when the line-item was created, can be adjusted if needed.
- Add quantity
- Add unit price
- Add total cost
- Add comments if needed (only available for net estimated cost)
This is how you would set up your project budget by adding the line-items one by one.
Budget template spreadsheet
The second option to upload your budget to Planyard is by using the budget template spreadsheet. Fill out all the information for your budget, then simply upload it to Planyard; the budget will be live immediately upon upload.
You can download the budget template here.
Let's go through all of the columns and what information is to be added in each column
| # | Column name | Column description |
| A | Category level | By entering '1' in this cell, you designate the line as a main category. Entering '2' transforms the line into a subcategory of the preceding main category, while '3' creates a sub-subcategory within that subcategory. There are no limits to the number of subcategories you can include in your template. For a detailed explanation and visual examples, see below. |
| B | Cost code | Add cost codes for line-items, categories and sub categories. There are no restrictions in the numbering; use whatever scheme is suited to your budget. |
| C | Line-item | Name of the line item, category or sub category; there are no restrictions in terms of how you want to name your line-items. |
| D | Unit | Fill out the unit of measurement for your line-items. This is all free text, and there are no restrictions, you can add whatever unit of measurement you want. Leave this blank for all categories and sub-categories. |
| Net estimated costs (yellow) | This group of columns represents the initial net estimated cost of your line-items. | |
| E | Quantity | Add estimated quantity. |
| F | Unit price | Add estimated unit price. |
| G | Net estimated cost | Add the net estimated cost. |
| Budget submitted to client (green) | This group of column can be used if relevant based on the contract with the client, you can add the budget that you have submitted to the client for each line item. | |
| H | Quantity | Add estimated quantity submitted to the client. |
| I | Unit price | Add estimated unit price submitted to the client. |
| J | Budget submitted to client | Add the price submitted to the client. |
| Target budget (purple) | If there is an internal target different from the net estimated cost, this could be tracked here. This could also be used to make adjustments at project start, e.g., if market prices have gone up or down for a line-item. | |
| K | Quantity | Add the target quantity. |
| L | Unit price | Add the target unit price. |
| M | Target budget | Add the targeted budget. |
| N | Comment | Add a comment to the line-item if needed. |
Upon upload, Planyard scans the information by reading the columns from left to right. You can leave any of the columns blank if you prefer not to include certain information. However, you cannot delete any columns, as that would cause Planyard to misinterpret the information.
Information beyond column 'N' will not be read, which means you can do notes or perform other calculations in column 'O' and onwards without affecting the budget uploaded to Planyard.
Formulas can be used in the template. Planyard will only recognise the final sum of each cell.
Category level in budget template
When adding category levels, assigning a '1' to a cell designates the line as a main category. Entering '2' makes the line a subcategory under the most recent main category, and '3' establishes the line as a sub-subcategory within the last subcategory. You can extend this hierarchy indefinitely by using '4', '5', '6', '7', etc., to create further levels of subcategories, each number representing a new layer of categorisation. Leaving a cell blank indicates that the line is a regular line item, which will be placed under the latest category or subcategory defined above it. There is no limit to the number of subcategories you can include in your template.
Here is a visual example:

Row 2: By adding '1' on category level to row 2, we designate 'Demolition' as a main category.
Row 3: By inserting '2' as category level into row 3, 'Waste Management' becomes a subcategory of the main category 'Demolition' (row 2).
Rows 4-6: Leaving the category level cells blank in these rows indicates they are line-items under the subcategory 'Waste Management' (row 3).
Row 7: By adding '2' as category level, we create a new subcategory, 'Demolition Contracts', under the main category 'Demolition' (row 2).
Rows 8-11: Leaving the category level cells blank means these are regular line items under the subcategory 'Demolition Contracts' (Row 7).
Row 12: Adding '2' as the category level creates a new subcategory under 'Demolition' (row 2).
Row 13: With the category level left blank, this becomes a line-item under the subcategory created in row 12, presumably 'Disposal of Demolition Debris'.
Row 14: By adding '3' to the category level, a new subcategory is formed under the subcategory 'Disposal of demolition debris' (row 12).
Rows 15 & 16: Leaving the category level cells blank classifies these as line-items under the subcategory 'Hazardous Material' (row 14).
Row 17: Adding '2' to the category level establishes a subcategory under the original main category 'Demolition' (Row 2).
Rows 18-20: The category level cells being blank indicates these are line-items under the subcategory 'Fees' (row 17).
Row 21: By inputting '1' in the category level, we start a new main category, setting the stage for all following subcategories and line items to fall under this category until a new '1' is entered in a subsequent row.
Rows 22-24: Since the cells are blank, these rows are line-items directly beneath the main category 'Structural Changes' (row 21).
Line-items from template
The third option is to select which line-items to use from a project budget template. Project budget templates can be created at the account level and then utilized when creating new projects within Planyard. To learn how to create project budgets, refer to this guide.
When choosing this method of creating the budget, you will first be asked to select which template to use. Once that is done and the project is created, the template will be displayed directly:

Use the checkboxes to the right of the categories and line-items to choose which items to include in your budget. When satisfied with your selection, click 'Add'.
Add information to line-items
Next step is to add information for all line-items created. Note that you only have to add information on the line-items, not for main or subcategories, these will have summarised numbers automatically.
The three columns you can add information to is Net estimated cost, Budget submitted to client and Target Budget. If your net estimated cost has the same value as the target budget, then just add information in the target budget.
The same information is added for the columns mentioned above. When you hover over a cell where you want to adjust information, a pen symbol will appear, click on the symbol to adjust the information:
- Unit of measurement will be filled out based on the information provided when the line-item was created, can be adjusted if needed.
- Add quantity
- Add unit price
- Add total cost
- Add comments if needed (only available for net estimated cost)