.png?height=120&name=logo%20(3).png)
In this article, you will find information on how to create and manage subcontractor and vendor bidding process in Planyard
Table of contents
- Introduction
- Video tutorial
- RFQ Process and Subcontractor Workflow
- Create a New Bidding Process
- Navigating the RFQ Overview
Introduction
Planyard’s Request for Quotation (RFQ) platform is designed to streamline and optimise the quotation process for construction companies. By enabling easy sharing of RFQs with vendors and contractors, the platform ensures a more efficient and organised approach to managing bids.
Rather than relying on various spreadsheets created in different formats, Planyard’s platform automatically uploads all submitted bids, allowing users to compare them effortlessly. This centralised system eliminates the hassle of manual data entry and reduces the risk of errors, providing a clear and transparent view of all quotations received.
The platform also enhances collaboration by allowing project owners to invite other users to participate in the bidding process. This means that team members can work together to review bids and make informed decisions. Once a winning bid is selected, it can be seamlessly transformed into an active purchase order or subcontract. This integration ensures that budget commitments are updated automatically, maintaining accurate and up-to-date financial records.
With Planyard’s RFQ platform, construction companies can enjoy a more streamlined and efficient workflow, improving overall project management and budget accuracy. In the following sections, we will explore the key features of the RFQ module and how they contribute to enhanced efficiency and transparency in construction projects.
Video Tutorial
RFQ Process and Subcontractor Workflow
Once an RFQ is created, a streamlined process ensures that all participants receive the necessary information and can easily submit their bids. Here’s how it works:
1. Notification to Subcontractors:
When an RFQ is created, emails are automatically sent to all recipients added during the creation process. These emails include the RFQ name in the subject line and the description in the body.
2. Bid Spreadsheet Template:
The email contains a dedicated link for downloading the spreadsheet template that subcontractors will use to submit their bids. The bid template is structured to prevent any modifications to the original format, allowing subcontractors to only enter their quantities, prices, and comments on the line items. All other documents uploaded when creating the RFQ will also be available under the link.
3. Completing the Bid:
Subcontractors fill out the spreadsheet template with their estimates. This includes entering the required quantities, pricing, and any comments or notes specific to the line items.
4. Submitting the Bid:
Once the template is completed, subcontractors use a second link provided in the email to submit their bids. This ensures that all bids are uploaded directly to the RFQ overview in Planyard. Full instructions for the subcontractors and vendors are available here.
5. Automatic Upload and Organisation:
All submitted bids are automatically uploaded to the RFQ overview, where they can be easily reviewed and compared. This centralises all the bid information, eliminating the need for manual data entry and reducing the risk of errors.
6. Manual Bid Entry:
If needed, project owners can manually add bids to the RFQ overview. This feature ensures that all bids, whether submitted electronically or manually, are included in the comparison process.
7. Reviewing Bids:
In the RFQ overview, project owners can see all the submitted bids, compare them using various tools, and evaluate detailed information for each bid. This helps in making informed decisions based on the comprehensive data provided.
By following this process, subcontractors receive a clear process to submit their bids efficiently, while project owners benefit from a centralised and organised system to manage and compare all received bids. This enhances transparency and collaboration, ensuring a smooth and efficient RFQ process.
Create a New Bidding Process
To create a new bidding process, follow these steps:
- Navigate to the project where you want to start a new bidding process
- Click ‘RFQ’ in the project menu row
- Click ‘Create RFQ’
- Fill out the requested information:

- Request for Quotation name: Name the RFQ. The name will be displayed in the subject line of the email sent to all participants and in the list of RFQs in your project.
- Deadline: Add a deadline for when the bids should be submitted.
- Remind bidders before the deadline: Choose whether or not you want Planyard to send an automatic reminder to the contractors or vendors. Untick the box to disable reminders.
- Number of days before deadline: Select how long before the deadline you want the reminder to be sent.
- Description: Add a description of the scope. You can also add links to documents for the scope if you have them in Dropbox, Drive, or other services.
- RFQ Recipients: Add recipients either by selecting groups or contacts from your contact database or by pasting a list of recipients.
- Select line-items to add: Select related budget line-items either from the drop-down menu or by clicking “Select in bulk” to see a full overview. Tick the boxes of cost headings or line-items you want to include.
On the right side of the screen, you see a box from where you can upload relevant documents, either by dragging the document into the box or by clicking 'Browse Files' and selecting the appropriate file.
Let’s have a look at the information displayed and features available when managing the line-items to be included in the RFQ. For all selected line-items, you will see the following information:
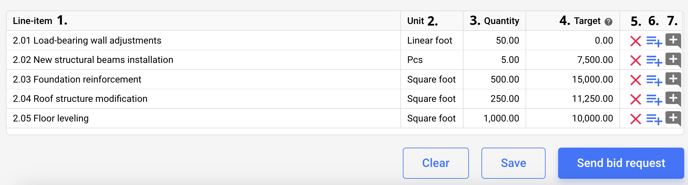
- Line-item: Visualizes the line-item name and cost code.
- Unit: Visualizes the unit of measurement for the item, which can be edited.
- Quantity: Displays the estimated target quantity, which can also be adjusted.
- Target: Visualises the target cost for the item.
- Red Cross: Removes an item by clicking here.
- Three lines with a plus sign: This feature allows you to do an additional breakdown of an item, enabling detailed specification of the scope and items you want the contractor or vendor to estimate on.
- Gray comment bubble: Allows you to add additional information that will be visible in the RFQ.
Once all the information is supplied, click 'Submit bid request' to create the RFQ.
Navigating the RFQ Overview
The RFQ Overview is a crucial tool for managing and reviewing all submitted bids in one location. It allows you to efficiently compare bids and make informed decisions. In the RFQ Overview, all bids are collected, providing a comprehensive view of the quotations received from subcontractors.
To navigate to the RFQ Overview, follow these steps:
- Navigate to the specific project for which you want to review the bids.
- Click on the ‘RFQ’ in the project menu.
- From the list of RFQs, select the one for which you want to view the bids. This will take you to the RFQ Overview.
Visual Options and Features
Let's start with going through the features available as well as visual options:
- Notes: View and add notes related to the RFQ. This feature enhances team collaboration by allowing team members to share insights and updates.
- Create next round: Initiate a new round of the RFQ process. When you click this button, you’ll be taken to the view to create a new RFQ where all previous information will be pre-filled. From here, it’s possible to edit information and participants and then run a second round. This feature is utilized to refine bids, invite additional bidders, or request revised quotations to ensure you get the best possible terms and prices.
- Create a copy: Duplicate the current RFQ for future use. This can be useful for creating similar RFQs without starting from scratch.
- Download comparison table: Export the comparison table of bids to a downloadable format.
- Download bid template: Get the template for submitting bids.
- Submit for approval: Submit the selected bids for approval.
- Archive: Archive the RFQ. Note that archived RFQs cannot be unarchived.
- Bidders: View the list of bidders who have submitted their bids. It is also possible to add notes on the bidders, and you can see who has interacted with the bid request.
- Related RFQs: Access other RFQs related to this project.
- Description: See the description of the RFQ.
- Configure view: Adjust the settings to customise the view of the comparison table. When clicking the button, you will be shown these visual options:
- Details: Ticking this will show details on the unit of measurement, volume and unit price for all lines.
- Highlight item best price: Ticking this option will highlight the best price for a line item in green. Unticking it will highlight all bids for line-items that are above the target price in red.
- Show scenario bidder: Tick this option to visualise scenarios that you've built.
- Minimize column headers: Ticking this option, will minimise the top row of the header and only the participant company name will be shown.
- Revised budget: Tick this option to have the revised budget shown as a separate column in the table.
- Client price: Tick this option to have the client budget shown as a separate column in the table.
- Visible bids: Indicate the number of visible bids out of the total bids received. Click here to select which bids to visualise and which order they should be visualised.
Bid Comparison Table
Now we will move on to the bid comparison table visualised in the RFQ overview and have a look at the data and information visualised:

- Add a bid: Click here to add a new bid to the RFQ.
- Compare bids: Use this feature to compare specific line items across different bids.
- Colaps column: Can be utilised to colaps cost headings or subheadings
- Line-item: Lists the individual line-items included in the RFQ, along with their names and cost codes.
- Revised budget: Displays the revised budget for each line item. Green and red highlights indicate whether any of the bids are within or over the revised budget for each line-items.
- Volume: Shows the volume or quantity for each line item.
- Client price: Displays the client price for each line item. Green and red highlights indicate whether any of the bids are lower or higher than the budget submitted to client for that line-item.
- Target cost: Indicates the target cost for each line item, with the best price highlighted in green and prices above the target highlighted in red. Green and red highlights indicate whether any of the bids are within or over the target cost for each line-items.
- Bidder information and actions: Provides details of the bidders, including names, email addresses, contact numbers, and the time of bid submission. From here you can also create subcontracts or purchase order directly from the bid comparison table.
- Create scenario: Click here to create a new scenario for bid analysis or project planning.
Furthermore, each bid will contain green and red highlights depending on your visual option. If the option for “Highlight best price” is unticked (as shown in the picture), bids that exceed the target cost will be highlighted in red for each item. If the “Highlight best price” option is ticked, the lowest cost for each line item will be highlighted in green.