
In this article you'll find a full overview of information as well as functionality featured in the project budget overview.
Table of contents
- Introduction
- Column information
- Revising Budgets and Managing Discrepancies
- Visual options
- Export
- Reorder line-items
- Historic data
- Add line-item
Introduction
The project budget overview can be described as the heart of Planyard. Here, you will find a comprehensive overview of the live project budget, with plenty of information displayed for each line-item. Below, you will receive an introduction to the information displayed, as well as the functionality that can be found in this section of Planyard.
Column information
In the table, you will find a short description of all columns available for the project budget
| Row Name | Description |
| Line-item | Line-item cost code and name |
| Net estimated cost | The net estimated cost for a a line item or category. Value presented is excluding taxes and mark-up |
| Target budget | Internal targeted budget, this might differ from the initial net estimated cost |
| Revised budget | The latest estimate of a line-item cost. This column is revised through out the project and is usually added by project manager. |
| Committed cost | Visualises all costs currently in subcontracts, purchase orders and stand alone cost documents. Committed costs are visualised independently if the the cost is yet to be paid or already paid. |
| Approved costs | Visualises all approved cost for the line-item (approved invoices, approved receipts). Note that payments may not have been done, but they are approved. |
| Budget Variance | Visualises the difference between the targeted budget and the current revised budget. Indicates whether the cost of a line-item is within the target or not. |
| Budget submitted to client | Shows the cost for the client, taxes and variations (change orders) are excluded. |
| Committed income | Here you will find already committed income which is based on details from client contract + approved income |
| Approved sales invoices | Manually documented sales invoices where the invoice has been sent to the client. |
| Committed change orders | Total value of variations (change orders) for subcontracts and purchase orders |
| In subcontracts | Visualises the amount of costs in subcontracts, including variations (change orders) |
| In progress reports | Costs approved in subcontractor progress reports (valuations) |
| Remaining budget | Displays the current available budget for each line item, calculated as the Revised Budget minus Committed Costs. |
Revising Budgets and Managing Discrepancies
The Revised Budget column is a critical part of managing your project’s finances in Planyard. While the Target Budget serves as a visual reference for your initial goals, the Revised Budget is the column you will actively work with throughout the project. This column represents your latest estimation of the cost for each line item and serves as the foundation for Planyard’s profitability calculations, forecasts, and other financial insights.
To ensure accuracy, Planyard provides notifications in the form of red labels when committed costs exceed the revised budget for a line item. These labels act as a prompt for you to review and update the revised budget, ensuring it reflects the current status of the item. Addressing these discrepancies is essential for maintaining financial control and avoiding unexpected cost overruns.
How to Revise Budgets
- Hover over the Revised Budget cell for the line item you want to update.
- Click the pencil icon that appears and enter the updated value.
Managing Notifications for Discrepancies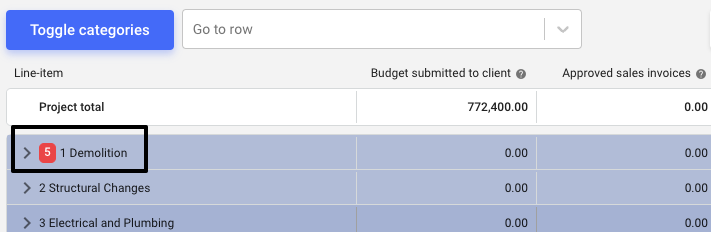
- When committed costs exceed the revised budget for a line item, a red label will appear in your budget view.
- This notification helps you quickly identify items requiring attention.
- To resolve discrepancies, review the committed costs and update the revised budget to better align with the current status of the item.
By keeping the revised budget accurate and addressing discrepancies promptly, you can ensure the reliability of your project’s financial insights and maintain control over costs.
Visual options
There are several options available in terms of visualizing the budget information:

- Toggle categories: Located in the top left corner, this button allows you to collapse or expand all categories in the budget.
- Go to row: Use the search function to visualise specific line items directly.
- Visible Columns: Customise the columns you want to see by checking or unchecking the boxes.
- Details: Toggle to display additional information such as estimated quantity and percentage of the line item budget used.
Export
At any time, you can export the budget contents to a different format. The export button is located in the top right corner. The export will be based on the information you are currently visualizing in the budget. Refer to the VISUAL OPTIONS section on how to adjust the displayed information.
When you click export, you can then select the format for the report: PDF, XLSX, or Cost Lines XLSX. With the Cost Lines option, you'll be able to select export based on a specific time frame.
Reorder Line Items
You can make three types of adjustments when reordering line items in the budget. First, you can change the order of the cost headings themselves. Second, you have the flexibility to rearrange the line items within a specific cost heading. Lastly, if necessary, you can move a line item from one cost heading to another, allowing for better organization and clarity in your budget.

- To reorder cost headings: click the three dots at the end of the Project Total row and select 'Reorganize top-level line-items'. This allows you to change the order of the main categories in the budget by dragging and dropping them to the desired location.
- To reorder items within a category: click the three dots at the end of the category row where you want to reorganize the items. Click ‘Reorganize line-items within the category’. This allows you to reorder the items within the category to your desired order.
- Move a line item or category to a different cost heading: click the three dots on the far right of the item or the category that you want to move. Click 'Move line-item to' or 'Move category to' (depending on what you are moving). Select the new location in the drop down and click 'Move item' or 'Move category'.
Historic data
If you hover over the name of a line item, a small stacked chart will appear next to it. Click the stacked chart to view historical cost data for the line item. This data is based on the costs associated with other projects within your company's account connected to the line item.
Add line item
In the top right corner, you'll find the 'Add line-item' button. You can use this button to add a new line item at any time, either one by one or by importing a new xlsx file with updated information. Additionally, from this button, you also have the option to create client variations/change orders.
Add a single line item
- Click the 'Add line-item' button and select 'Add custom'.
- Enter a cost code and a line item name.
- Choose whether to place the new line item under another category or as a standalone item at the bottom of the list.
- Select the unit and click 'Create'.
Once the line item has been created, you can add information by hovering over a cell and clicking the pencil icon that appears. For example, you can add details such as the target budget, budget submitted to the client, etc.
Add client variation/change order
- Click the 'Add line-item' button and select 'Add Client variation'.
- Enter a cost code and a line item name.
- Provide information regarding the agreed sales price.
- Provide information regarding internal targeted costs.
- Click 'Add variation/change order'.
The change order is now added to the budget and can be used like any other line item in the budget.
Import file
You can import additional line items at any time by using the budget template spreadsheet and uploading it to your active project. All imported information will be placed at the bottom of your budget. Click HERE for more information on the budget template spreadsheet. To upload new items via the template:
- Click the 'Add line-item' button and select 'Import file'.
- Drag the file to the designated box or click 'Browse files' and select your budget template.
- Click 'Import'.
You will find all cost headings and items contained in the template at the bottom of your budget.
.