.png?height=120&name=logo%20(3).png)
In this article, you will find extensive content on invoice management in Planyard
Table of contents
- Introduction
- Video Introduction to Purchase Invoices
- Project Files Overview
- Processing Invoices
- Costs Overview
Introduction
Planyard provides a straightforward method for collecting and processing invoices, ensuring that relevant information is sent to accounting and that the live budget is updated accordingly, all within a single process.
In this article, you will find information on how to process invoices once uploaded to the platform. For information on how to set up the collection of invoices, refer to this guide.
When an invoice is imported into Planyard, the system automatically scans it for relevant information, allocating it to the correct project for approval if the details are accurate. Invoices related to subcontracts or purchase orders are automatically linked, with vendor information, line items, and essential data like the invoice number and date extracted directly.
This streamlined process saves time by automating information flow and reducing the risk of human error.
Video Introduction to Purchase Invoices
Project Files Overview

The files tab at the project level serves as a central repository for all documents related to the project. All invoices allocated to the project are stored here until they are processed, ensuring they are organised and easily accessible. In addition to purchase invoices, you can also upload sales invoices for processing. Notifications on the project menu row will notify you if there are any documents yet to be processed. Let's go through the functionality for the project files overview:
-
Upload files: You can manually upload files by clicking 'Upload files' in the top right corner.
-
Tabs: Over the list of files, you will see three tabs - cost files, other files, and drafts. All files uploaded to Planyard will be automatically sorted under cost files (since the majority of imported files are invoices). If a file is not related to costs, it could then be moved to the tab 'Other files.' Under 'Drafts,' you'll find invoices where we have started the processing but not finished it.
-
Tickbox: In front of the imported files, you will see a tick box. Clicking the box enables you to perform actions on the file:
-
Mapping: If there are several files related to the same event, tick the boxes for the files and click 'Mapping.' This will allow you to tie several files to the same cost.
-
Delete: Click here to delete the file.
-
Move to inbox: If the file has been allocated to the wrong project, click on 'Move to inbox' to move it back to the company inbox.
-
Change to other: Change the file from a cost file to another file.
-
View individual files: If you have received an email containing multiple files that Planyard has imported, this function enables you to see them as a group or individually.
-
Processing Costs
You can begin processing a cost or invoice in Planyard through two methods. If the invoice has already been uploaded to your project, simply navigate to the files tab and select the invoice you wish to process. Alternatively, if the invoice or cost has not been uploaded yet, go to the costs tab and click on 'Approve new cost.' This option will allow you to manually upload the invoice for processing.
When processing a purchase invoice or other cost documents, information is automatically retrieved through OCR scanning. The invoice number, due date, and invoice date are details that Planyard will automatically extract, provided they are clearly stated on the invoice. To process an invoice, navigate to the project files, click on the invoice you wish to process, and fill out the necessary information.
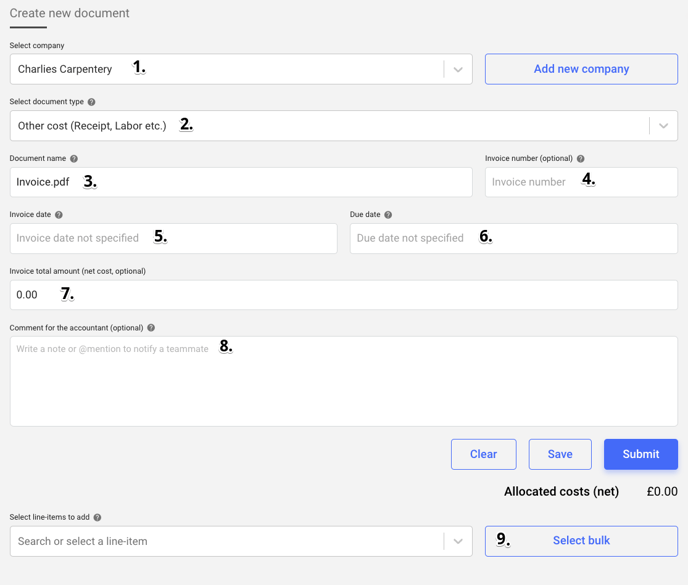
- Select the supplier or subcontractor that issued the invoice. If the company is not listed, click 'Add Company' on the right to add it. The document type options in the next step will vary based on the selected company, as Planyard identifies ongoing processes with that contact.
- Select the document type. Available options for cost documents include:
- Other costs (receipts, labor, etc.)
- Invoice for a subcontract (available only if there is an ongoing contract with the contact)
- Invoice for a purchase order (available only if there is an ongoing purchase order with the contact)
- Invoice for a valuation (available only if there is an ongoing valuation with the contact)
- Name the invoice.
- Enter the invoice number.
- Enter the invoice date.
- Enter the due date.
- Add the total invoice amount (optional). This helps in allocating costs, allowing you to see how much has been allocated and how much remains.
- If necessary, you can add a comment for the accountant to see when issuing the payment.
- Select the line items related to the invoice by choosing a line item from the dropdown menu or clicking 'Select in Bulk' to view an overview of your budget. This allows you to select multiple items where you want to allocate the cost for the invoice.
- Allocate the costs to the line items.
Costs Overview
The Costs tab collects all cost documents for the site, allowing you to see details and open all costs associated with the project. This overview includes invoices, receipts, and other expense records processed in Planyard. Let's go through information presented in the overview as well as related features:
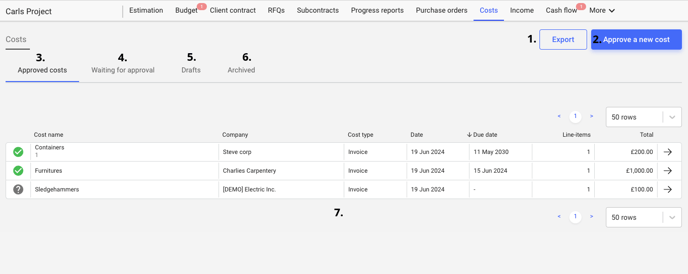
- Export Button: Allows you to export the list of cost documents.
- Approve a New Cost Button: Click to approve a new cost for the project.
- Approved Costs Tab: Displays a list of all approved cost documents.
- Waiting for Approval Tab: Shows a list of subcontractor payment applications that are yet to be approved.
- Drafts Tab: Contains all draft cost documents.
- Archived Tab: Lists all archived cost documents.
- Cost List:
- Colour Indicators: Visualises the status of internal approval process.
- Cost Name: Names of the cost items (e.g., Containers, Furnitures, Sledgehammers).
- Company: The name of the company associated with the cost (e.g., Steve Corp, Charlies Carpentry, [DEMO] Electric Inc.).
- Cost Type: Type of cost (e.g., Invoice).
- Date: Date of the cost document (e.g., 19 Jun 2024).
- Due Date: Due date for the payment (e.g., 11 May 2030, 15 Jun 2024).
- Line-items: Number of line-items in each cost document.
- Total: Total amount for each cost document (e.g., £200.00, £1,000.00, £100.00).